Teacher Tech Series Part Two: Digital Lesson Planning
When I first started teaching, I hated lesson planning. I loved teaching from day one, but when I had to sit down and write out plans I was doing it on someone else’s terms (meaning it wasn’t in the format that was helpful to me), and I knew by writing it down I would look at it once and then have to redo it again next year.
I hate doing things twice.
That’s when I stopped writing my lesson plans on paper and kept them completely digital. Most teams I worked on did the same, which gave us a huge advantage because then our plans were sharable. That’s a total game changer when it comes to collaboration for a team - seriously, it was beautiful.
Collaboration and team planning is one of the biggest benefits to digital lesson plans, but there are many others, and I want to point you to episode 5 of this podcast where I give 3 Steps to Sustainable Planning, and the first step is to go digital. In that episode I talk about the benefits, so that this episode picks up where it left off and gives you actionable steps to take in going digital with your lesson plans.
After listening to this episode you will have four techniques to implement for your digital lesson plans, four things that will make them the living, breathing, useful documents that they should be, rather than the inaccessible, write-it-down-and-never-look-at-them-again plans of old.
Because here’s the thing. As much as we love edtech and using technology to make our lessons more effective, the teacher tech is just as important. What better way to learn along with our students than to implement and use many of the tools they are using in ways that optimize our time and effectiveness.
So if you’ve ever wanted to forget your lesson plan book - I know, it’s hard because they are so cute, but there are other ways to implement that cuteness - and optimize your planning by keeping it digital, then this episode as part two of our Teacher Tech series is for you.

Before we get started, I’ll say it again that if you haven’t yet, go back and listen to episode 5 of this podcast, 3 Steps to Sustainable Planning, and then come back and listen to this episode. Episode 5 is a great precursor to this one because that one very much tells you why, whereas this one is going to tell you how.
Something else I want to tell you is that you need to make it to the end of this episode. I’ve got 4 suggestions on how to best create your digital lesson plans, but at the end I give not just one, but two bonus tips. You won’t want to miss them so be sure and listen all the way to the end.
Alright, let’s get straight into it.
Shared Document
No matter what your lesson plans look like, no matter the formatting or what’s in them, they need to be a sharable and editable document whether that is through Google Docs or Microsoft 365. Gone are the days where you email a word document, someone saves it to their computer, makes changes to it, emails it back and then the person has to replace the original file hoping they didn’t make any of their own changes that will now live in a separate document.
No no, the file has to be live - edits are seen and saved immediately all in the same document.
This is imperative for collaborative teaching teams, which I would argue 90% of teachers are working on whether that means you have a rockstar team of two or more teachers with the same prep that meet weekly, or you teach the same prep and every once in a while share ideas, or you’re part of a Facebook group or multi-district collaborative team of same-subject teachers that share ideas and brainstorm together. Having a document that’s sharable and that changes being made are seen as they’re made is huge.
Some advice I’ll give here is that because it’s a shared document, you’ll want to set parameters on whose document it is and what kind of access people have. If it’s your document, and others are using it as a frame of reference, don’t give them the access to edit it. But if you work as a team where you do the same exact thing each day, then assign each team member a job based on what they are planning and adding to the document. You could break up your planning by day or plan together and then divide and conquer tasks like creating student guided notes, formative quizzes, summative assessments, etc.
Having a shared document allows you to divide and conquer effectively, plus, and here’s a little bonus tip… then you can all link what you’ve created straight into that document rather than looking in the abyss of your folders or emails for each moving piece of your plans.
Lesson Plan Template
And here comes tip number two - make a document that is your planning template. This means that you create what you lesson plan is going to look like every single time you write one, then you are going to title it with the capitalized word TEMPLATE, and from there you will make a copy of this exact document each time you start a new document that is the next lesson plan you’ll write.
This also helps any team you’re working on to work from the same format that helps you know exactly what you’re looking for and working for. the uniformity allows your brain to know what to expect when you go to implement the plans, as well as what to be thinking about when creating your plans.
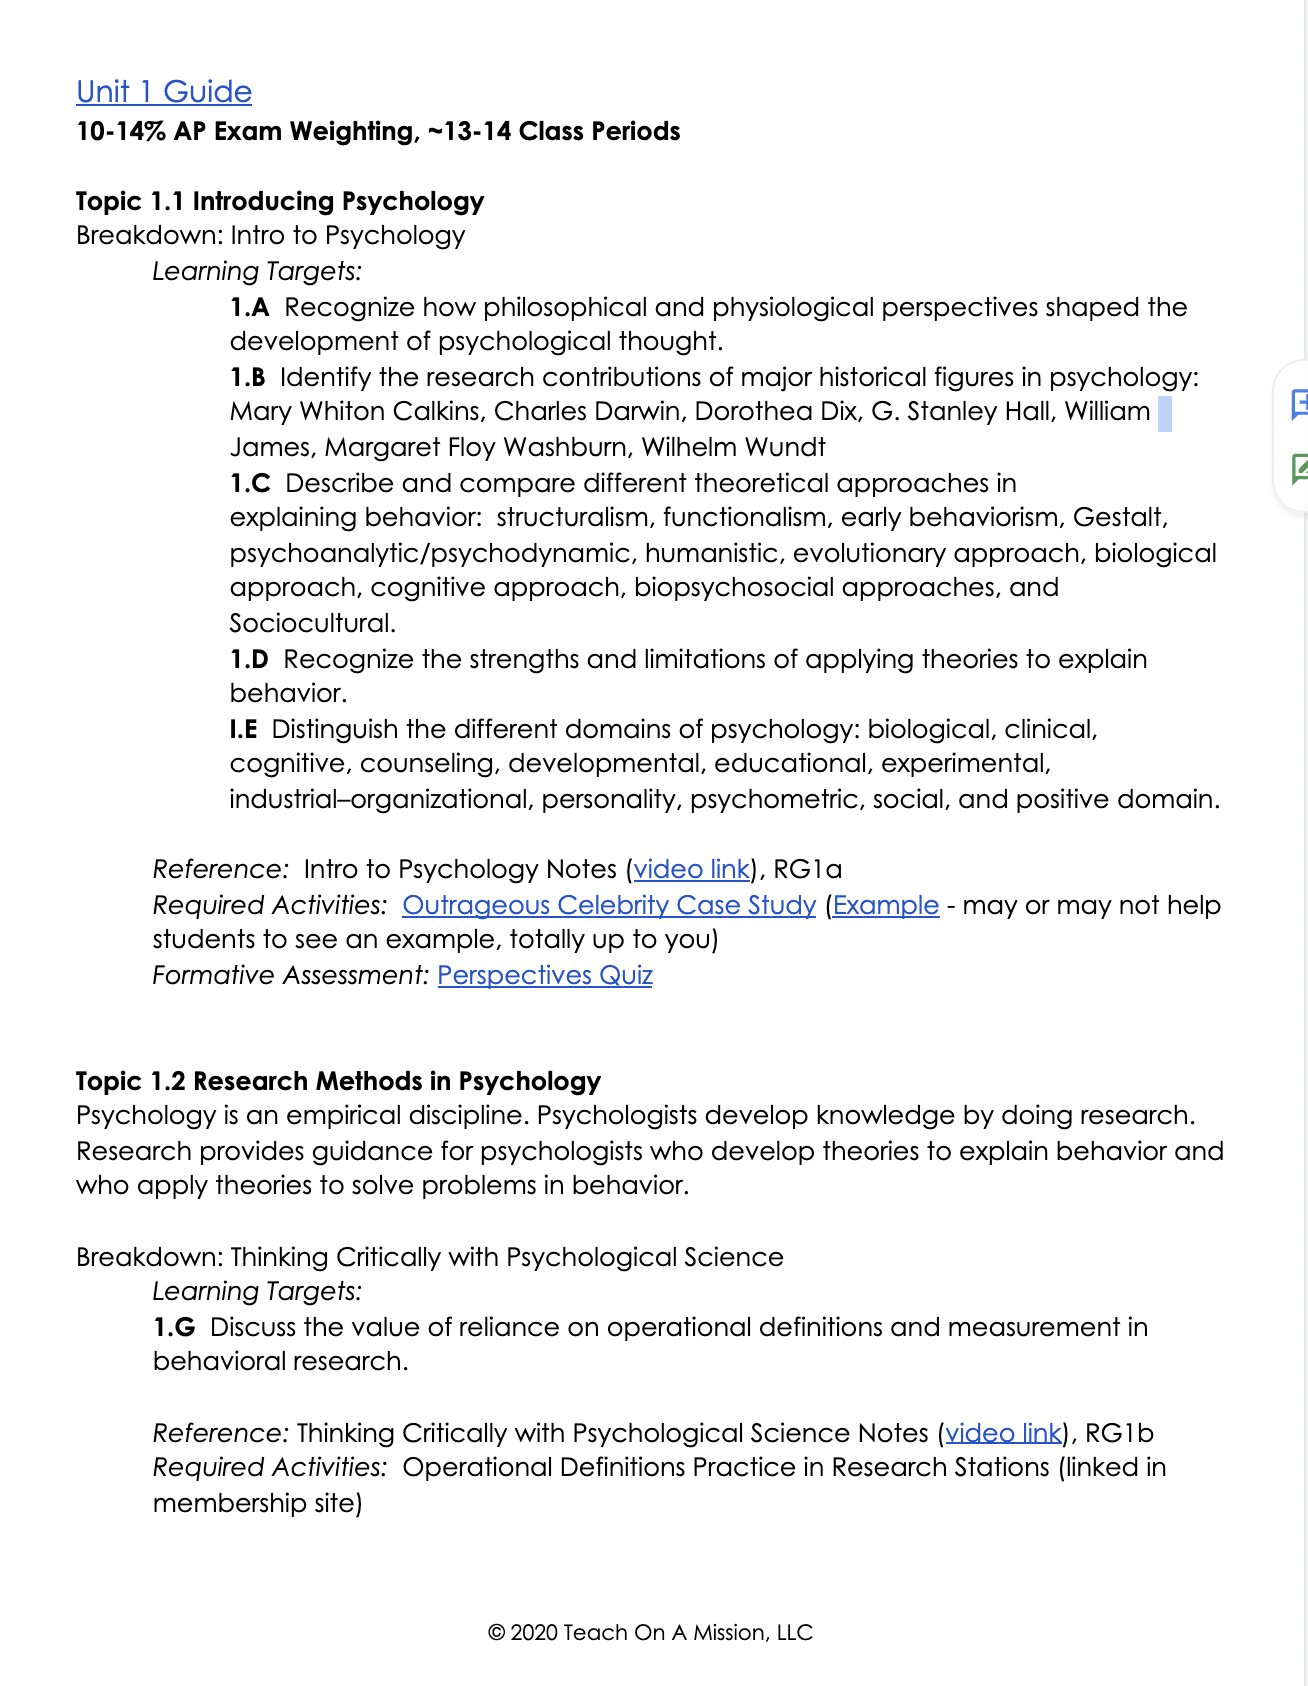
An additional tip I’ll give within this bigger suggestion of using templates is to write Unit plans instead of lesson plans. I like to create and use Unit plans (what I call Unit Guides). Because they are digital they can be huge, which means I have to go to less places (less tabs) in order to have what I need in front of me at any given time.
Now, you may be listening and know that you’re unable to do this because you are provided a template lesson plan. What I will say to that is to make your own copy of it, and title it with Template in the name, then you can make a copy from there each time. It’s really no different. But if you are given autonomy over your lessons, work together as a team to decide the format, and always work from that.
I have some screenshots available in the full length show notes linked below where you’re listening, you can head there to see some of my example digital unit guides and lesson plans. The unit guide structure that you’ll see is the same structure that I teach in Flipped Classroom Formula, Blended Classroom Blueprint, and in each of our Content Coaching Memberships - so if you’re a part of any of those, this is not a new concept to you, and I hope you’re using and loving it.
Today's episode is brought to you by...
Camtasia
Today’s episode is sponsored by Camtasia. The day I started making videos for my more accessible and flipped classroom ten years ago was the day I started using Camtasia. Camtasia is a software suite, created and published by TechSmith, for creating video tutorials and presentations directly via screencast, or via a direct recording plug-in to Microsoft PowerPoint, making it super user-friendly for teachers to record, edit, and get their instruction in front of their students without all the hassle. As you become more familiar and comfortable with the easy-to-use tool, you’ll realize more awesome features you can grow into when you’re ready - like adding thought bubbles, captions, awesome backgrounds and even music. It is the best tool for beginners to produce quality, long-lasting flipped videos, and the possibilities are endless when you’re ready to explore more features.
And get this - they offer teachers a discount!
To learn more about Camtasia and to get an ADDITIONAL 10% discount because you’re a Sustainable Teacher Podcast listener, head over to teachonamission.com/camtasia.
That’s a huge savings you don’t want to miss on what will quickly become the most used tool in your toolbox like it has been for me for 10 years. Again that’s teachonamission.com/camtasia.
Now, let’s get back to the episode.
Use Tables
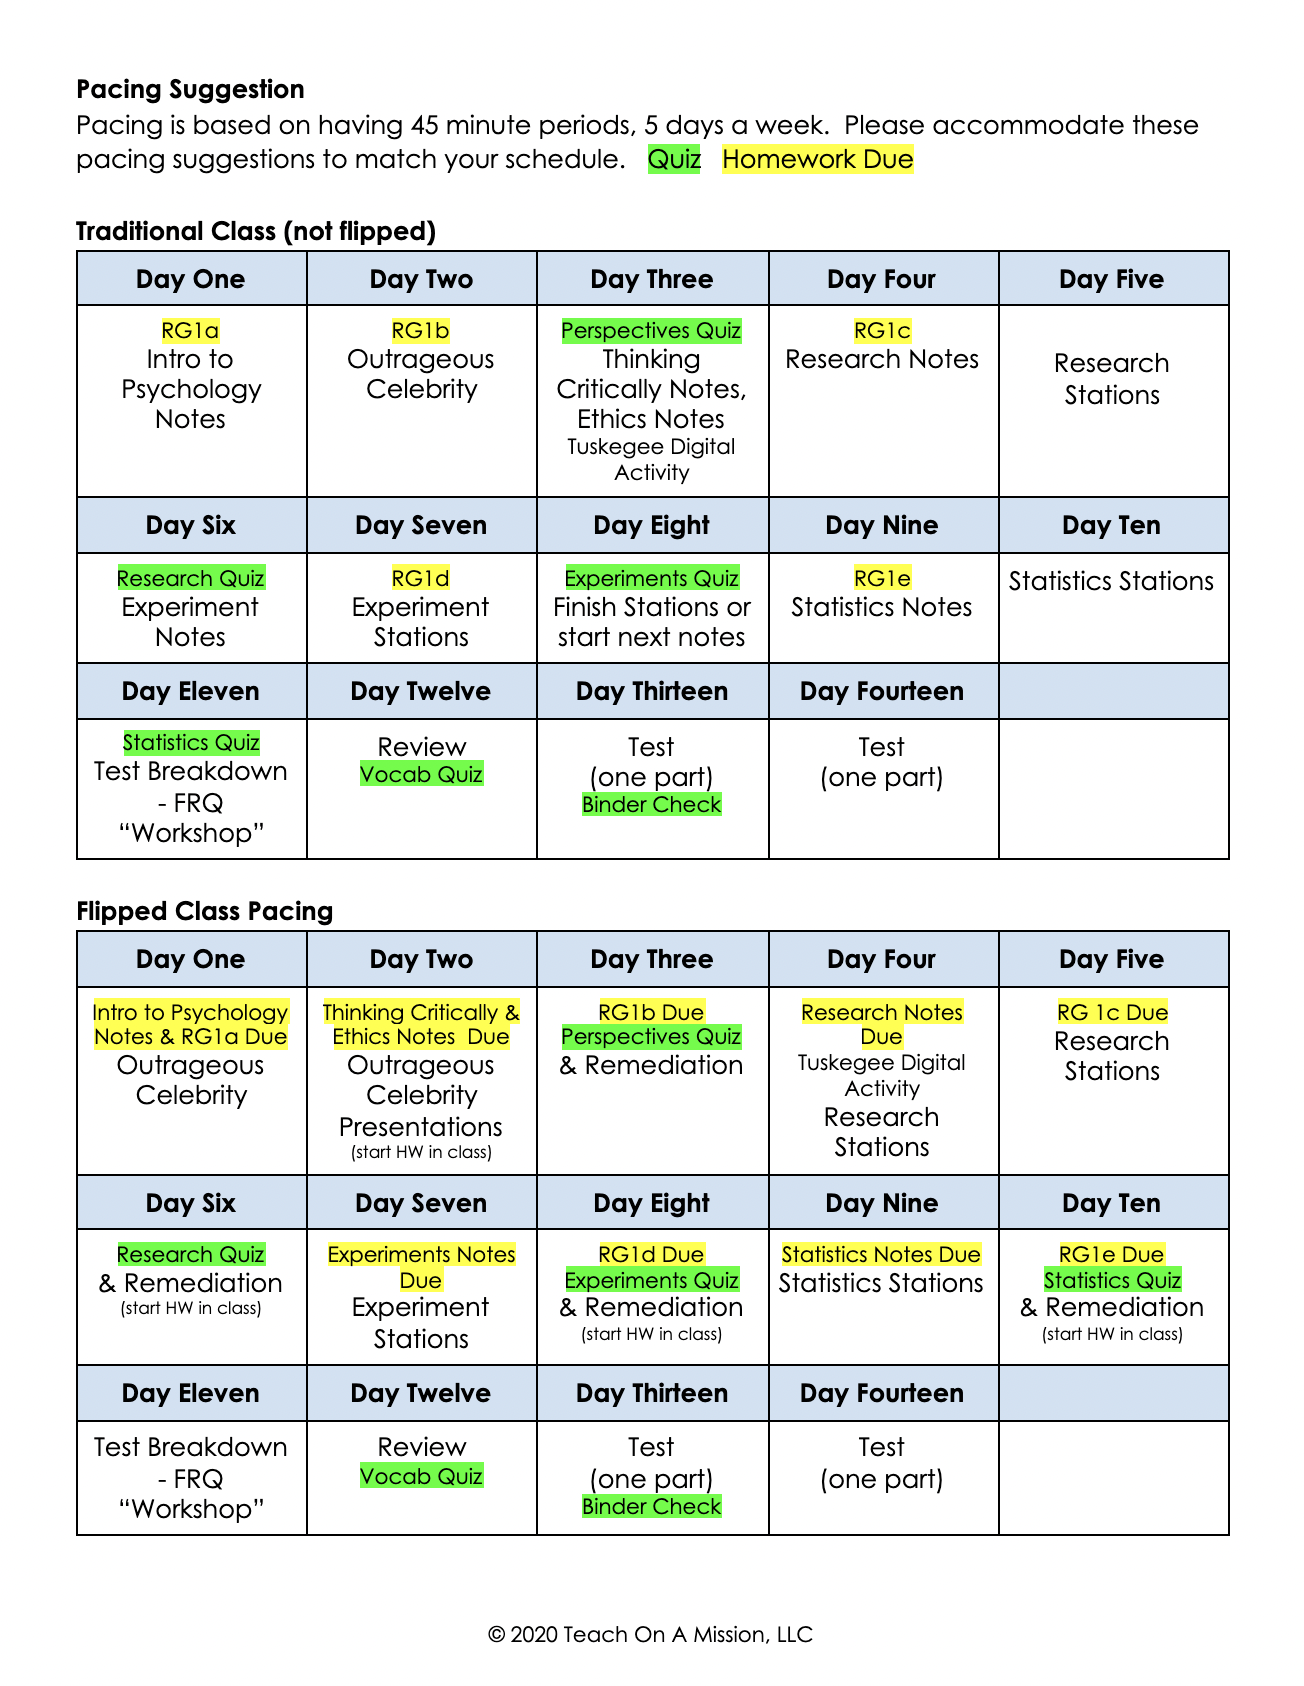
The third suggestion I’d like to teach here for making digital lesson plans is to use tables. In the unit guides I create and use as mentioned in the last suggestion, I start off with a break down of the standards and what standards will be covered in any given topic (in an outline format), each topic normally took about two days, from start to finish with a quiz. Then I’d have the pacing calendar below that which would guide me and others on each day of the unit which topics we were “covering.” So, for instance, in each of our content coaching memberships where we provide each and every unit’s guide for those courses, the teachers we work with can see each day what we suggest they be doing (and in each day we provide pertinent links and necessary information that way there is less searching around for lesson materials).
We then used that calendar (which was just a table) to guide us to lesson plans, the specific day’s action plan. So each of those days in the table could be linked directly to a separate lesson plan, if that’s the format you would like to use.
A little side note I’ll make here is that if tables make it too formal or stuffy to you, just make the lines white (or transparent) instead of black, that way you get the organization without the boxed-in feeling. I love the organization of tables, and you can still have that organization without the visible lines there.

Table of Contents
The final tip I’ll give in best practice for digital lesson planning is to use the table of contents feature inside of the word processor. What this allows you to do is have a table of contents at the top of any doc (which will be helpful when you have all lesson plans in one place or a lengthier document like a unit guide we talked about already), and clicking on those links will take you to the corresponding section of that document. So you could list each day of the unit at the top of document, and when you’re on day seven, click on that link, and bam it takes you directly to that part of the document even if it’s ten pages down.
On a Google doc you just go to your navigation bar at the top, click insert, and select table of contents. Then you’ll see two options - I select the second option with the blue lines because this table of contents will automatically link directly to the section of the plan I’m referring to.
I’ll give you an example so you can visualize this. Let’s say my team and I have decided that we will list out the standards broken into topics, then the pacing calendar, then the individual lesson plans. What I’ll do then with those three “titles” is type them in the doc and make them each into a heading. You do this by selecting the text, go up to the editing toolbar, and where it says “Normal text”, I’ll switch that to a good heading, for instance heading 2. Then I go back up to where I inserted the table of contents and I click the refresh arrow next to it and voila, the linked table of contents appears.
- Insert > Table of Contents> select options with blue lines
- Click enter under the table of contents a few times and type your first section heading, i.e. Standards outline
- Select the title you just typed and change it from “Normal Text” to a heading of your choice in the toolbar toward the top of the screen (look for the drop down menu that says “Normal text”).
- You’ve made you title into a heading, now make it show up in your table of contents by going up to your table of contents and clicking the refresh circle arrow to the left. Voila!
For a recap of those step by step directions, head to the full length show notes linked below where you’re listening.
Do I print my lesson plans?
Now the big question is… do you print these out? Once I’ve made all these digital plans, should I print them?
I’ll give you my answer, which is no, but ultimately, it’s totally up to you, but you need to know why you’re doing so. If you are new to your course, grade level or subject area and like having the plans physically in front of you (and they can travel the room with you as necessary) since you haven’t taught the lesson before, then by all means print it, or just have it up on your tablet or laptop that’s near you when teaching.
But do NOT print these just to keep them in a book or binder of your lesson plans. You’ll never look at it again unless it is to reflect, jot down notes, and make some necessary improvements… all of which you should do on the digital lesson plan anyway since it’s right there and actually editable. You already have a lesson book or binder… It's just digital now.

Make them Quickly Accessible
Now I have a bonus tip for you… I already gave 4, but I have a fifth, bonus suggestion when it comes to your digital lesson plans. The whole point of this is that the digital lesson plans are accessible, editable… living, breathing documents that are actually useful.
Well, if they are buried in the disheveled mess of your Google Drive or files on your computer, then they aren’t as accessible as they need to be in order to give you the full potential advantage of digital planning.
Here is my suggestion, and I give you options - you can implement one or both. You are able to make shortcuts on your desktop, meaning you’ll have an icon on your desktop that is your unit guide. Another way is to link the unit guide in your bookmarks bar. I would always bookmark the current unit’s guide and the next one coming up so that I had quick access to what I needed now and what I was planning with my team.
Folder Organization
And, like I said at the beginning, I don’t have just one bonus tip… I’ve got two. Another tip I’ll give you pertains to your folder organization and where the Unit Guide lives. In Google Drive and folder organization on your computer everything is listed in alphabetical order.
Hopefully you’ve got a folder system already, something like one folder per unit of your course, and inside each one is everything pertaining to that unit. Right?!?! Pretty simple stuff. But inside those unit folders is a ton of stuff, probably, and Unit Guide falls pretty low on the alphabet. I liked having the most important document for my purposes of each unit at the very darn top because it where everything began and ended for me. So, to make your unit guide listed first in your list of materials inside your folder, put an asterisk at the beginning of the title… makes it so much easier to find it right there at the top. So instead of Unit One Guide, it’s *Unit One Guide.
And there you have it teacher-friend; five suggestions you can be implementing to start digitally lesson planning today. Remember, the real beauty of this is what it does for collaboration so share this episode with your team, teacher-friends, and colleagues. Let them know about these benefits and get to digitally planning.
Come join us in the Sustainable Teacher community linked in the show notes below where you’re listening. In that link you’ll also find out how to get three full video how-to tutorials from yours truly that will help you up your teacher-tech game.
That’s a wrap for part two of the teacher tech series, and I’ll see you here next week for part three on your calendar and project management system. It’s going to be a good one. See you then. Bye for now.
P.S.
Before you go! I have to tell you about an awesome opportunity that I've guided over 500 teachers through, and is now available to you! Ever wanted to flip your classroom? How about flipping before next semester? Well, if you want it, we can do it, together 😀. Head over to my totally free Flipped Classroom Masterclass to learn how (and receive CEUs for the training) by signing up here. Hurry, because it won't be available for free for long. See you there!
Author

Mandy Rice
Author
Hey! I'm Mandy. I've been teaching for 10 years and flipping for about the same. I hope you find just what you need here in my little edupreneur website and blog your all your flipped classroom needs.
Recent Posts
You want to flip your classroom but don't know where to start?
Get Mandy's Ultimate Flipped Classroom Starter Kit!

